Contact Us

If you still have questions or prefer to get help directly from an agent, please submit a request.
We’ll get back to you as soon as possible.

Please fill out the contact form below and we will reply as soon as possible.

Sign in
  • Sign in
  • Home
  • Getting Started

Add New Users

With no user limits, ensure your full team is in the nest.

Contact Us

If you still have questions or prefer to get help directly from an agent, please submit a request.
We’ll get back to you as soon as possible.

Please fill out the contact form below and we will reply as soon as possible.

  • Getting Started
    • Sign In
    • Setup Locations
    • Add New Users
    • Setup User Roles
    • Manage Users
    • Integrate Social Pages
    • Make Business Phone Textable
    • Activate Call Forwarding
    • Birdeye Mobile App
    • Additional Support
  • Products
    • Listings
    • Reviews
    • Referrals
    • Social
    • Social Messaging
    • Website Leads
    • Payments
    • Automations
    • Campaigns
    • Messaging
    • Appointments
    • Surveys
    • Insights
    • Competitors
    • Ticketing
    • Reporting
    • BirdAI
    • Insights AI
    • Competitors AI
  • Video Library
  • Resources
    • Birdeye Webinars
    • Birdeye Guides
    • Birdeye Blogs
    • Customer Videos
    • Birdeye Podcast
    • Birdeye Results
  • Developer Portal

How do I add new users to the Birdeye account (single-location)?

Birdeye allows you to add users to your account effortlessly. Using Birdeye's robust User Management System you can add a single user separately or can add multiple users at once. To add users to your Birdeye account, follow the steps detailed below:

ADD A SINGLE USER

To add a single user, follow the steps detailed below:

  1. Click on the 'Settings' tab on the left navigation rail, then navigate to the 'Account' section, and select 'Users.'
  2. Click on the 'Add user' button on the right. Now, you will see an option to add either a single user or multiple users. To add a single user click on the 'Add user' button under the 'Add a single user' section.
  3. Add the following information in the assigned fields: First Name, Last Name, Email Id (Required), Mobile Number and click the 'Next' button.
    Delete

    IMPORTANT

    By default, the 'Send email invite' toggle button will be switched on.

    • If you leave this button ON and save the settings, it will send an email to the new user with login details.
    • If you do not wish to send an email invite, you can turn it off and create a password for the new user. You can share the username (Email ID) and password generated by you separately.
  4. Now, assign a role to the user by clicking the 'Select' dropdown menu and clicking on the 'Next' button.
  5. On the last page, customize the 'Notifications' settings and click on the 'Save' button. 

ADD MULTIPLE USERS

Birdeye gives you the functionality to add users in bulk and also defines the kind of alerts the user would like to receive for new reviews, social mentions, and tickets.

To add multiple users, follow the steps detailed below:

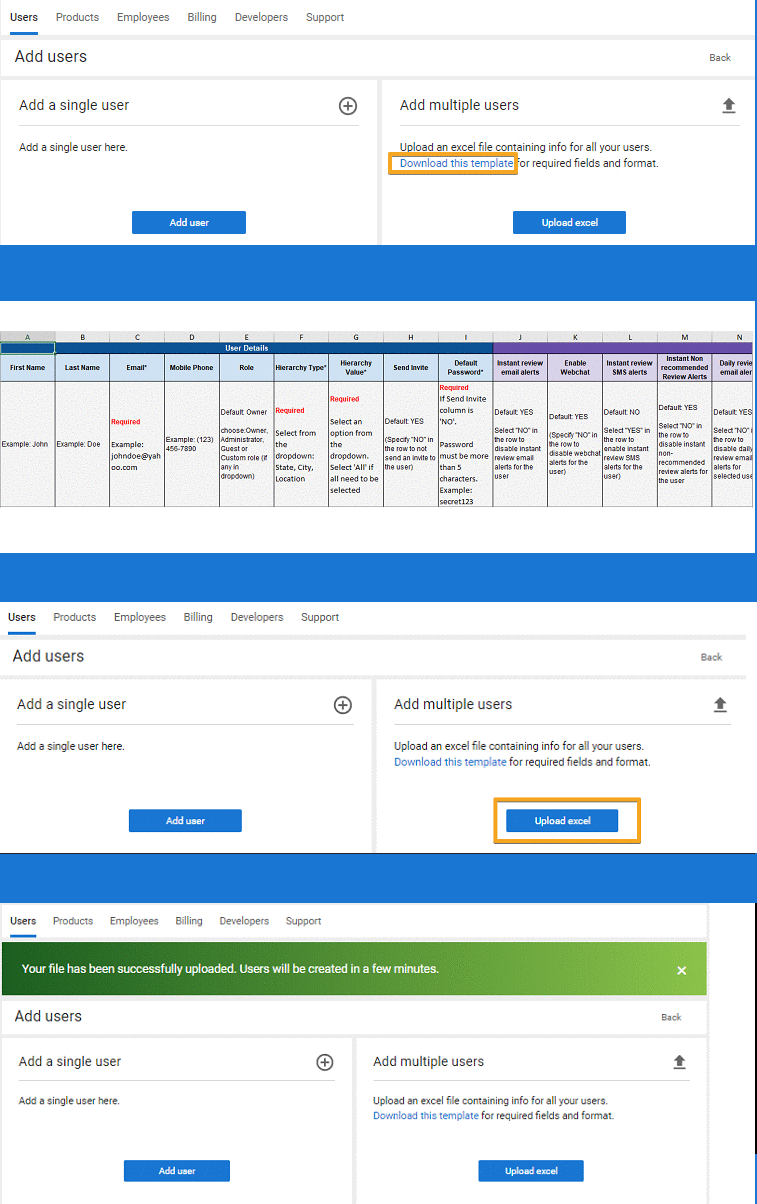
  1. Click on the 'Add user' option under the 'Users' tab using the steps detailed above. You will now see the option to add a single user and as well as multiple users to your Birdeye account. Click on 'Download this template' highlighted in blue under the 'Add multiple users' panel.
  2. A Microsoft Excel document will be downloaded on your computer. Once you open the document, you will be asked to fill in basic information about the new users and also define the alert settings for each type of alert possible from Birdeye.
    Fields marked in red are mandatory and need to be completed. In case you do not wish to fill in the non-mandatory fields, Birdeye will populate default values (also provided within the Excel spreadsheet).
    User-added image
  3. Once you have set the alert settings and have filled in the user information, you can upload the Excel document to the Birdeye dashboard under the 'Add multiple users' panel.
  4. Once you have uploaded the Excel document, you will receive a notification confirming the upload. An email notification will also be sent to the users added to the Birdeye account with their login details.
    User-added image
Delete

NOTE

Now businesses have the access to control the source for which they want to get the browser notifications. If the agent wants notification for only Google and Facebook then they will have to mention Google, and Facebook in the Inbox push notification column.

Delete

IMPORTANT

  • This is available in the bulk upload sheet.
  • By default, the agent will get notifications for all the sources.
  • If the conversation is assigned to the agent, then they will receive the push notification for that conversation regardless of the source. 
add new users add multiple users add single user robust user management system inbox push notification assigned conversations

Was this article helpful?

Yes
No
Give feedback about this article

Related Articles

  • How do I manage notification settings for a user added to Birdeye?
  • How do I manage locations assigned to a user?
  • How do I access my Birdeye account?
  • How do I manage users added to my Birdeye account?

Still can't find what you're looking for?

Create a case
Birdeye for businesses
  • Attract
  • Listings
  • Reviews
  • Referrals
  • Pages
  • Google Seller Ratings
  • Convert
  • Messaging
  • Webchat
  • Social
  • Mass Texting
  • Appointments
  • Payments
  • Delight
  • Surveys
  • Insights
  • Benchmarking
  • Ticketing
  • Objectives
  • Google for local business
  • Review Management
  • Review Generation
  • Online Reputation Management
  • Customer Messaging
  • Referral Marketing
  • Website Chat
  • Google Reviews
  • Google My Business
  • Facebook Reviews
  • Business Listings Management
  • Customer Experience
  • Industries
  • Automotive
  • Dental
  • Financial Services
  • Healthcare
  • Home Services
  • Legal
  • Property Management
  • Public Storage
  • Real Estate
  • Retail
  • Wellness
Learn more
  • Company
  • About Us
  • Leadership Team
  • Watch Demo
  • Book a time
  • Resources
  • Blog
  • Press
  • Product Updates
  • Careers
  • Success Stories
  • Birdeye Reviews
  • Birdeye Results
  • Contact Us
  • Services
  • Managed Services
  • Professional Services
  • Support and Tools
  • Scan Your Business
  • Find a Business
  • For Developers
  • Birdeye Support
  • Refer a Business
Ic App Ios BlackIc App Android Black
CONTACT SUPPORT
  • Terms & Conditions
  • Privacy Policy
  • Security
  • HIPAA
  • CCPA
  • © 2023 Birdeye Inc

Knowledge Base Software powered by Helpjuice

Definition by Author

0
0
Expand